GPU Architecture and GPU Kernels
In this post, we will discuss how GPU architecture and GPU kernels look like. First, we will introduce GPU structure, secondly, we will develope a simple GPU kernel and discuss different scenarios. This is an introductory level post, the idea is to get the reader familiar with the architecture and implementation. Also, quick note to mention, I am aware that these technologies are getting improved and changed very frequently, however, I believe, grasping the main logic behind them will be helpful to adapt new versions and developments.
The Graphics Processing Unit (GPU) is special hardware, that processes data in immensely parallel way, which leads to much higher instruction throughput and memory bandwidth than the CPU within a similar power budget.
How SKU looks like?
SKU stands for Stock-Keeping Unit, it’s usually a synonym with a type of hardware / something in stock. It’s mostly used meaning “type of server” (kind-of like AWS’s instance types). Generally, SKUs with GPU cards attached have a “host” part and “devices” part. These two parts are connected with PCIe bus.
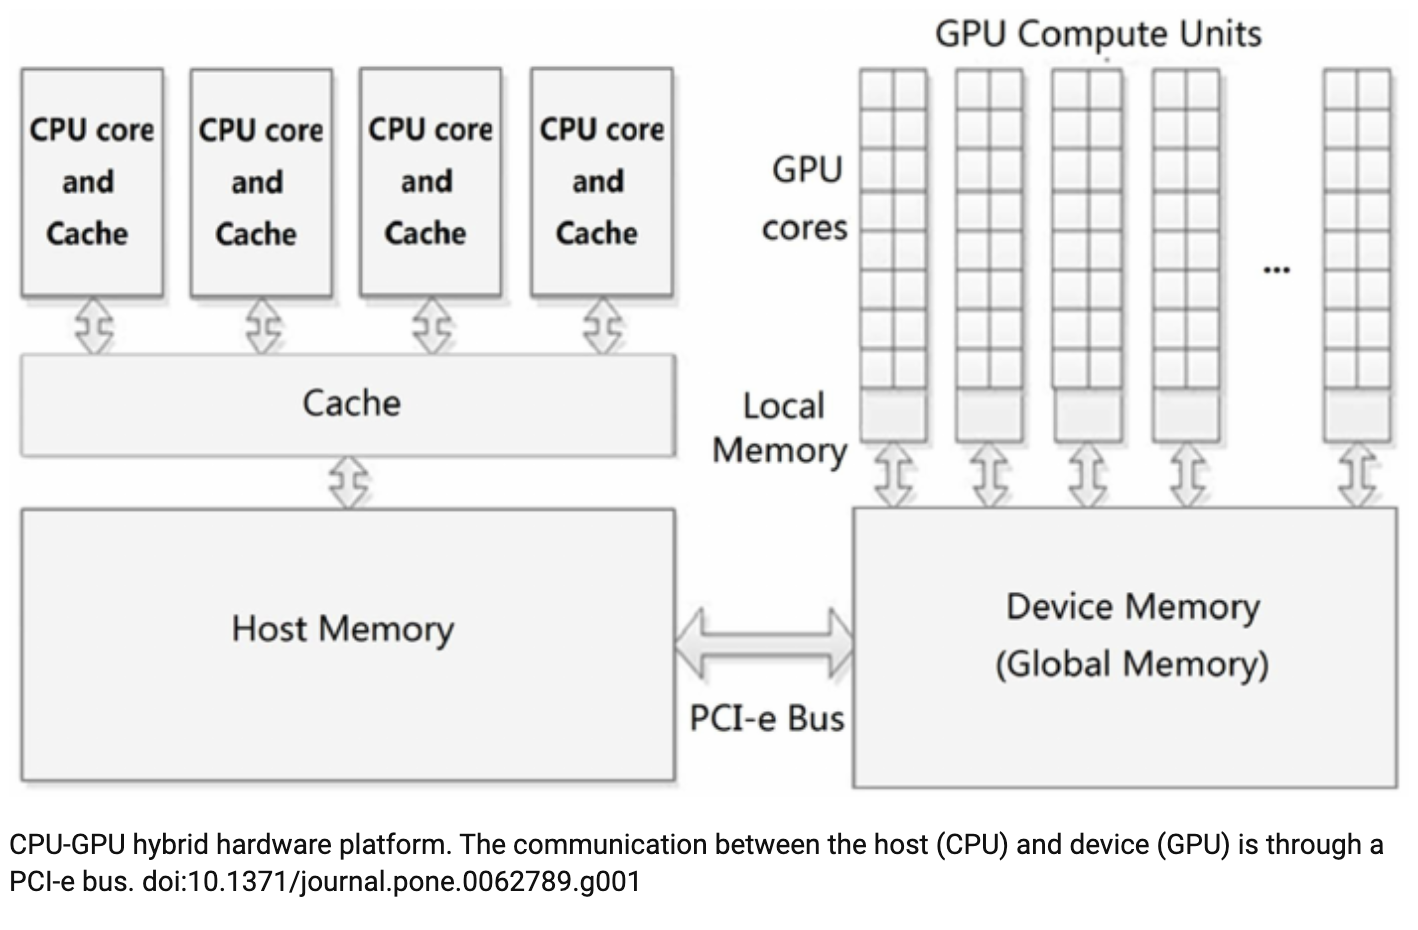
Even though the picture above shows 4 CPU cores in the host part, in general, these SKU’s are customizable. In other words, the number of cores and and number of GPUs attached and amount of memory in both sides are not fixed. The main things to remember about this SKUs are
- We have host part, which consists of CPUs and Memory
- We have one or more GPUs (each of them called “device”) in devices part
- Each of these device has its memory (In some generation, it is 40G or 80G)
- There is a memory shared among these devices
- Host and GPU part are connected via PCIe bus
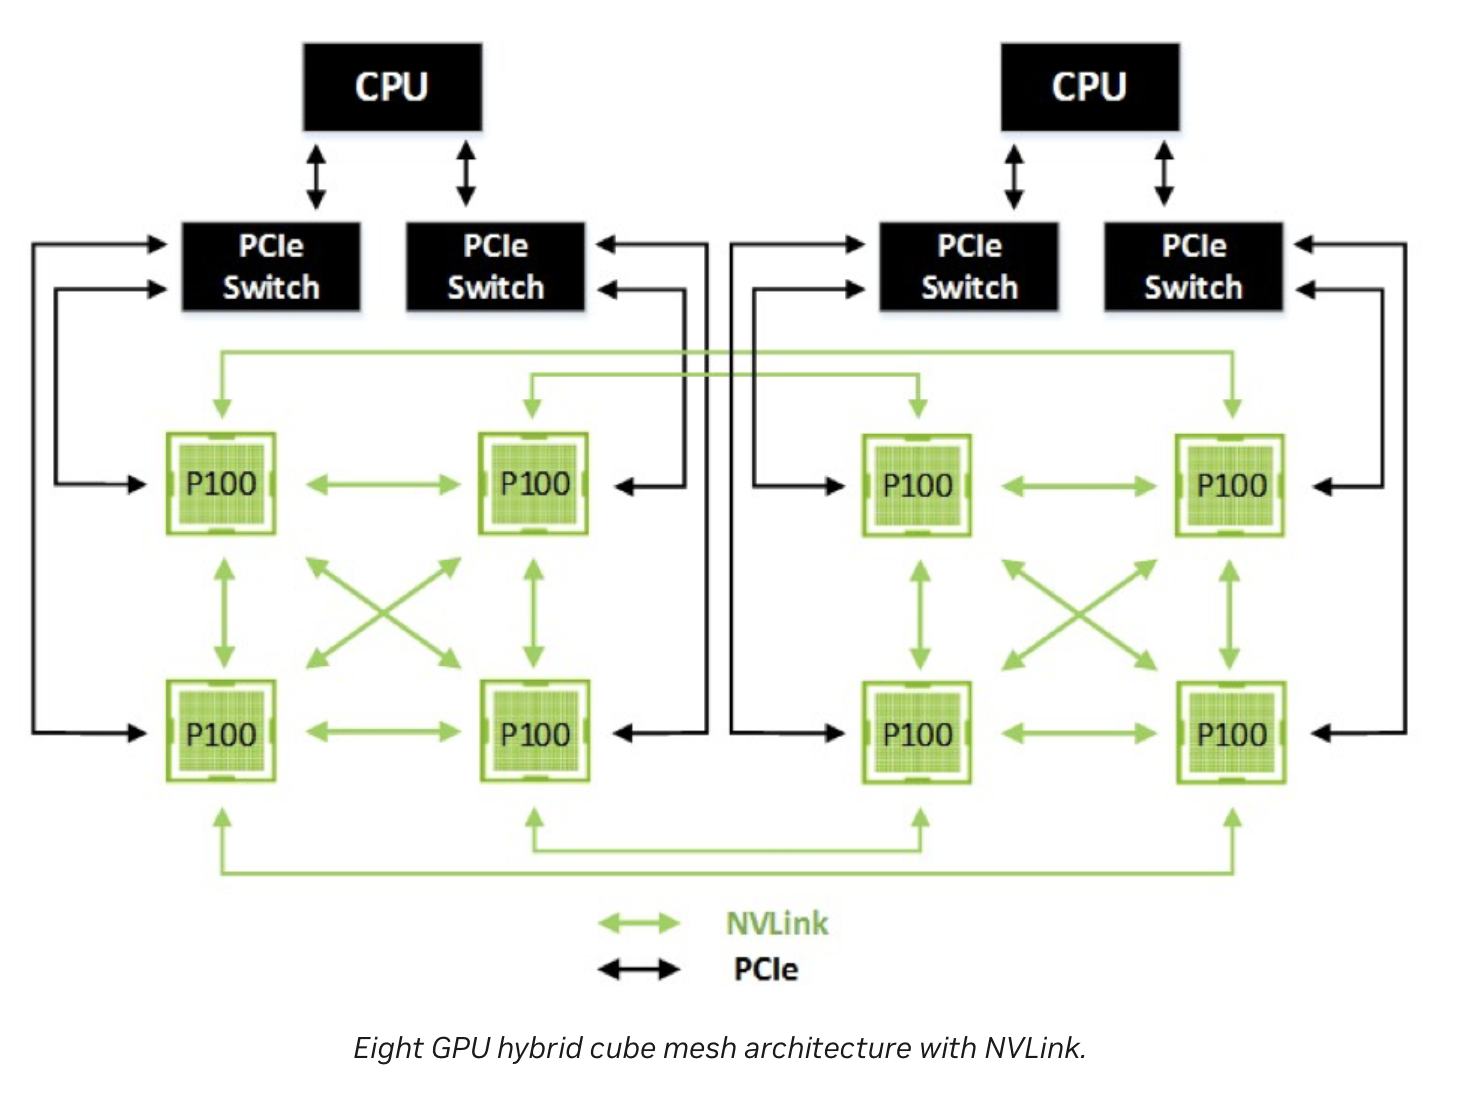
In addition, these devices has mesh connection between them. That means, all the devices has a direct access to all other devices (via NVLink). This architecture is super efficient in most use cases, such as gradient syncronizing/sharing in deep learing training process. This mesh connections avoid devices to send/receive messages via PCIe bus through host memory (which adds latency and power usage), they just directly talk to each other.
How GPU architecture looks like?
In this part, I will go through how the inside of GPU device/card looks like. Even though, the newer generations/versions( ex: H100) have much more advanced cores (Tensor Cores, etc), the main principle should be helpful to understand how the cores are structured. Basically, there are grids which contain multiple blocks and blocks contain threads. Each of these threads execute functions. These are jsut programming abstractions in order to manage parallel execution of threads/fucntions. Here are more formal definitions, and picture explains them::
- Kernel: name of a function run by CUDA on the GPU.
- Thread: CUDA will run many threads in parallel on the GPU. Each thread executes the kernel.
- Blocks: Threads are grouped into blocks, a programming abstraction. Currently a thread block can contain up to 1024 threads.
- Grid: Contains thread blocks.
We mentioned CUDA here, which we will explain in detail later in this post, in short, it is a programming platform to run programs on GPUs.

How to utilise immense parallelism?
So, GPU device/card contains thousands of threads, however, we should learn how we utilise them. Nvidia provides a programming platform called CUDA which is used to interact with GPUs. It provides very useful built-in libraries/function that helps developers to focus on their logic and algorithm instead of how to schedule and manage threads. Here are some of them:
- cudaMalloc: Allocate memory on device memory
- cudaMemcpy: Copy vectors from host memory to device memory or vice versa
- cudaDeviceSynchronize: Wait for GPU to finish before accessing on host
- cudaFree: Free memory
How to write a CUDA Kernel?
Just to reiterate the definition, kernel is a function that CUDA runs on GPU threads. Namely, CUDA is a platform and programming model for CUDA-enabled GPUs. The platform exposes GPUs for general purpose computing. CUDA provides C/C++ language extension and APIs for programming and managing GPUs. We will use CUDA C++ for our example, however, there are also other interfaces implemented in different programming language, such as Python. (cuPY is the library for Python). We will first go through a very basic CUDA example, in order to understand its syntax and architecture, then we will write our own CUDA kernel.
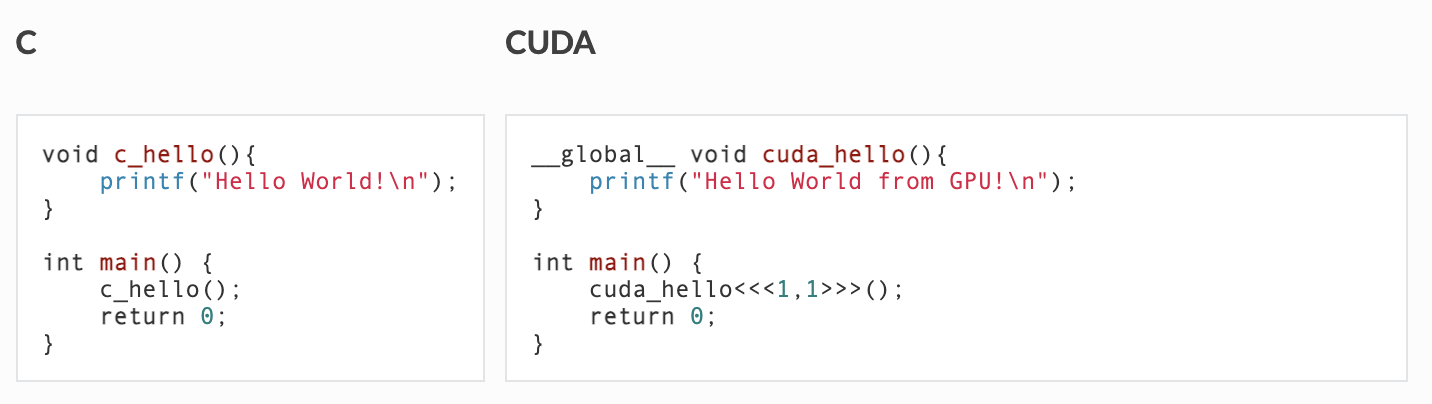
In the figure above, you see a program that is written in C versus CUDA. As you can see, we have a keyword global in the method definition. Here is its definition and other options:
- __global__ the function is visible to the host and the GPU, and runs on the GPU
- __host__ the function is visible only to the host, and runs on the host
- __device__ the function is visible only to the GPU, and runs on the GPU
In addition, as it can be seen, we call kernel with the configuration parameters enclosed in triple chevrons («< … »>). The information between the triple chevrons is the execution configuration, which dictates how many device threads execute the kernel in parallel. The first argument in the execution configuration specifies the number of thread blocks in the grid, and the second specifies the number of threads in a thread block. In our example, the configuration indicates to run cuda_hello() function/kernel in one thread in one block.
Now, since we got familiar with the syntax, lets write a bit complicated,(still super simple) application. Our example, is for adding up two vectors. We are aiming to add each element of the vector in separate thread. For instace, lets say we want to add two arrays with size of 500, we want 500 threads run in parallel to sum elements in each index of the array. This is how our kernel will look like:
#include <math.h>
#include <stdio.h>
#include <iostream>

// Kernel function to add the elements of two arrays
__global__ void add(int n, float* x, float* y) {

  int index = blockIdx.x * blockDim.x + threadIdx.x;
  int stride = blockDim.x * gridDim.x;

  for (int i = index; i < n; i += stride)
    y[i] = x[i] + y[i];
}
You should have noticed some built-in variables threadIdx.x, blockIdx.x, blockDim.x, gridDim.x. Basically, these variables are provided by CUDA, and their definitions are:
- threadIdx.x: contains the index of the current thread within its block,
- blockIdx.x: contains the index of the current block within its grid
- blockDim.x: contains the number of threads in the block.
- gridDim.x: contains the number of blocks in the grid
Basically, what we are trying to achieve here is, which thread is going to compute addition of which index in the arrays. Even though, it seems like every kernel will add all the elements in the array (because of for loop causing confusion), it is NOT the case.
Now, lets trigger these kernels to run in parallel. Here is the code snippet for that:
int main(void) {
  int N = 1 << 10; //2 to the power of 10, which is 1024
  std::cout << "N is: " << N << std::endl;
  float *x, *y;

  // Allocate Unified Memory – accessible from CPU or GPU
  cudaMallocManaged(&x, N * sizeof(float));
  cudaMallocManaged(&y, N * sizeof(float));

  // initialize x and y arrays on the host
  for (int i = 0; i < N; i++) {
    x[i] = 1.0f;
    y[i] = 2.0f;
  }

  // Run kernel on 1000 elements on the GPU
  int blockSize = 1024;
  int numBlocks = (N + blockSize - 1) / blockSize;
  std::cout << "numBlocks is: " << numBlocks << std::endl;
  add<<<numBlocks, blockSize>>>(N, x, y);

  // Wait for GPU to finish before accessing on host
  cudaDeviceSynchronize();
  std::cout << "values: " << y[0] << std::endl;

  // Check for errors (all values should be 3.0f)
  float maxError = 0.0f;
  for (int i = 0; i < N; i++)
    maxError = fmax(maxError, fabs(y[i] - 3.0f));
  std::cout << "Max error: " << maxError << std::endl;

  // Free memory
  cudaFree(x);
  cudaFree(y);

  return 0;
}
(Again, this is super simple example, the goal is just to show the syntax and structure of the CUDA program)
As you noticed, we are using some built-in CUDA functions, which makes our job much easier. Lets do quick walkthrough the codebase:
- We allocated memories for storing elements via cudaMallocManaged
- We triggered the execution via add«<numBlocks, blockSize»>(N, x, y);
- We waited for all executions to finish via cudaDeviceSynchronize();
- We freed the memories after execution
Conclusion
In this post, I tried to give brief introduction to GPU architecture and how to write a simple GPU kernel. The idea was to get the reader familiar with the concepts. As I mentioned before, this technologies are moving fast, the architectures I showed here might be outdated soon, and also, there might be some new advanced CUDA APIs or CUDA kernels to process data much for efficiently. Please refer to whitepaper of GPU versions/generations for more details.
Thanks for reading!
Resources:
- Correction: A Hybrid CPU-GPU Accelerated Framework for Fast Mapping of High-Resolution Human Brain Connectome by Y. Wang et al.
- https://developer.nvidia.com/blog/inside-pascal/
- https://docs.nvidia.com/cuda/cuda-c-programming-guide/